How to Make a Penny Stove
Larry Schirmer inspires me to whole new creation levels. He makes his own everything, which is something I respect and desire. One such home-made product is the alcohol penny stove. He used it during Spring Break of 2010 on the beach of the Atlantic outside Boston.

This is the man himself, March 2010.
This inspired me to make my own sort of penny stove. I thought it’d be fun to document it in the coolest blogosphere way as possible, which, of course, means to use lots of pictures.
As I speak, Valerie is packing up all of her belongings to take with on our summer adventure. We leave Monday night for Boston from Chicago. It’s a 22 hour ride. We’ll have a post about this coming up soon. But for now, the stove.
I followed some basic step by step instructions I found online. I used a wikihow, which has a twelve step instruction process at http://www.wikihow.com/Make-a-Simple-Beverage-Can-Stove . Here are mine.

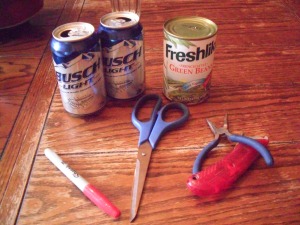
Step 1: Assemble materials.
It took a few tries to get the beer cans to stay on the table. Here in Michigan, you get big bucks to recycle cans like these. Total worth of two cans? 20 cents. You take the cans to these Giant Robots at the grocery store, and they destroy them, then spit out a receipt that you can exchange for cash! Crazy, right?
 Step 2: Create the base of the stove.
First I traced it out with a red sharpie marker, and then used a box-cutter that was in the back of my van. I think it’s left over from the days my brother Jon worked at Wal-Mart. One of the things you receive when you get a job is a nametag, and a sharp box cutter. My adidas sports jacket is still torn from opening some boxes frozen TV dinners at Wal-Mart in 2005.
 Step 3: Create the burner holes in the top of the can.
I found this giant pushpin inside my van one day. I have no idea where it came from, but it worked great to puncture holes in the top of the can. With a little force I punched 16 of these guys in the bottom of the second can. This serves as the top of the stove.
 Step 4: Make the fuel drainage hole.
These were punched with the big yellow guy as well. They are supposed to be a flower shaped, but they didn’t quite turn out symmetrical. This is where you pour the alcohol in. The top ‘primes’ the alcohol beneath, heating it to burn, and dripping down to light the bottom. If these holes aren’t big enough, and there aren’t enough of them, the can could explode. Seriously.
This makes it so the two halves can fit together.
Step 6: Cut small vertical slits. (not pictured)
This helps the two pieces meet together. Just a bunch of narrow slits to help the top piece fit inside the bottom piece.
Step 7: Fill with sand or other soaking material.
I didn’t do this step, but at some point I will add some sand.
 Step 8: Fit the stove together.
Success! 8 tedious steps later, and it fit! The slits on the side helped a lot, my RA from last school year, Taylor K., had his stove crack when he tried to piece them together. The slits made fitting it together easy. Next time, I’ll make sure the top part is the same height as the bottom part, so that they fit better. You don’t want that sharp edge from the bottom cutting your hand.
Step 9: Prepare the stove
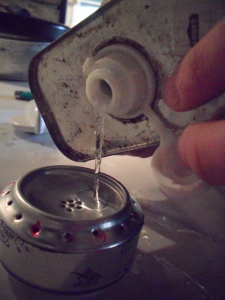
I poured the alcohol in about half full. Well, actually, the first time, I definitely over-filled it. It was practically overflowing.
Step 10: Prime the stove.
I have yet to perfect this step. This involves lighting some alcohol on the top, with the penny covering the holes, in order to heat the alcohol beneath it to catch. Sometimes, there’s a big BOOM when I light it, like a mini-explosion. Mind you, while we experimented with potentially explosive materials, Valerie’s family were in the room right next to us, working out a business deal. I don’t know whether they heard our mini-booms, and ignored them, or if they just really weren’t that loud. Anyways, there are enough holes that the stove hasn’t exploded, and I am confident that it will not.
We didn’t have any matches, so I lit a toothpick to use, so that I didn’t have to light it straight from the lighter.
The first few times we lit it, the alcohol spread a little bit, so you can see that by the next picture, we had inserted the bottom plate so the overflowing alcohol wouldn’t spread. Little David, Valeries brother, told us we were silly for lighting a stove on a stove. 🙂
After lighting, and burning off the excess alcohol, this is the finished product! I am quite satisfied with how this worked out, especially for the first try.
 This is the boiling of water. I didn’t measure the water, but it was a little under half of a pot- plenty enough water to make 2-3 packets of Ramen. It boiled in about 7 minutes!
Pretty awesome, huh?
Anyways, this was my first endeavor with an alcohol-burning penny stove, aka, the ‘hobo’ stove.
Total time? About an hour. It’s lightweight, fast, and according to a textbook on the Appalachian trail, it’s the only stove that is 100% dependable.


Very cool, David! I needed the visuals…thanks.
Pingback: Transitioning from Bike Trip to School | On Two Wheels
Pingback: How I Rode My Bicycle Across America & You Can Too!